Originally Posted October 7, 2021
Have you ever been at the quilt shop and come across a panel that you just love, but then when you get home you have no idea what to do with it? Or is that just me?!?!
I don’t usually buy panels, not because I don’t like them (because I like a lot of them!), but because I never know what to do with them when I get home. Some panels are just one picture, some are just a few pictures, and some are an entire alphabet or more! Some even have different sized pieces within the panel and that can add even more to the question, “what now?”
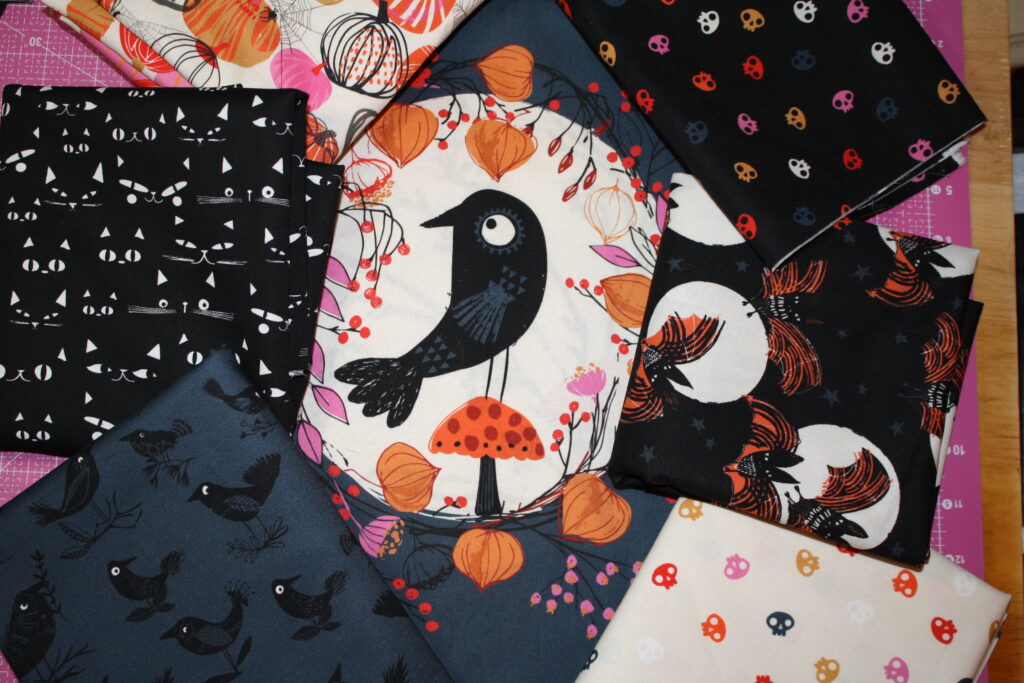
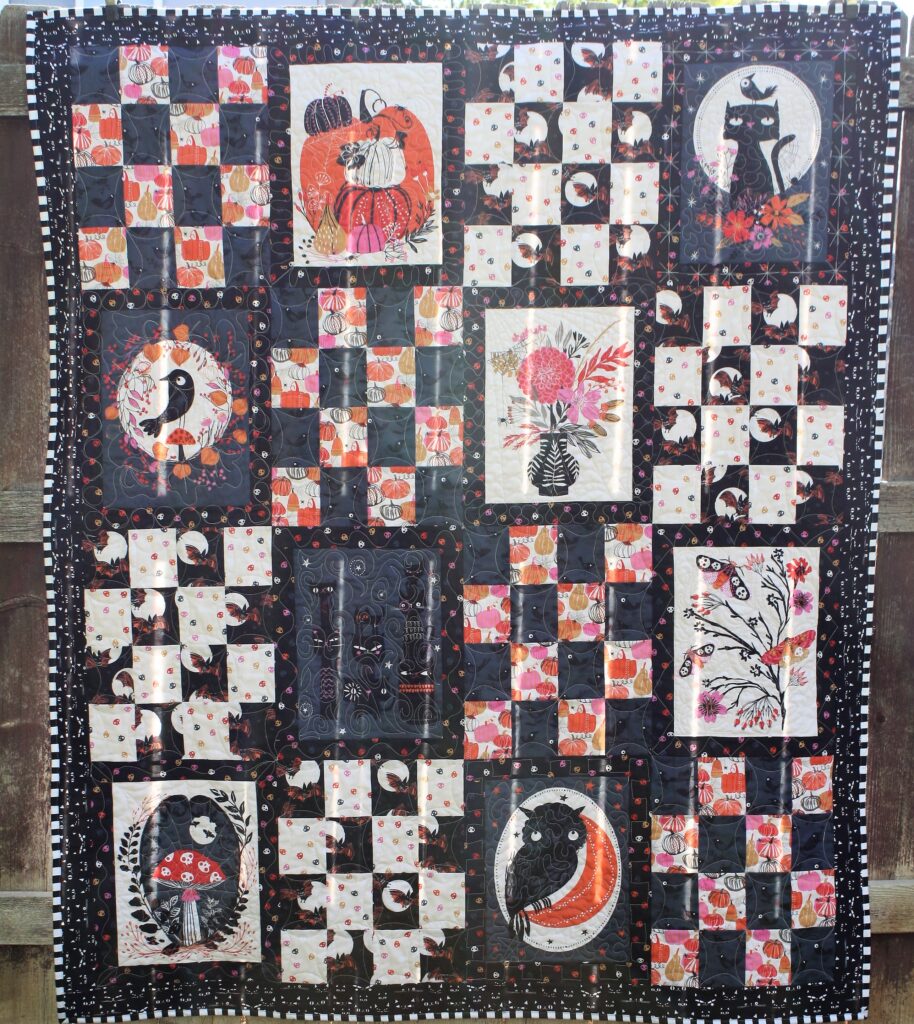
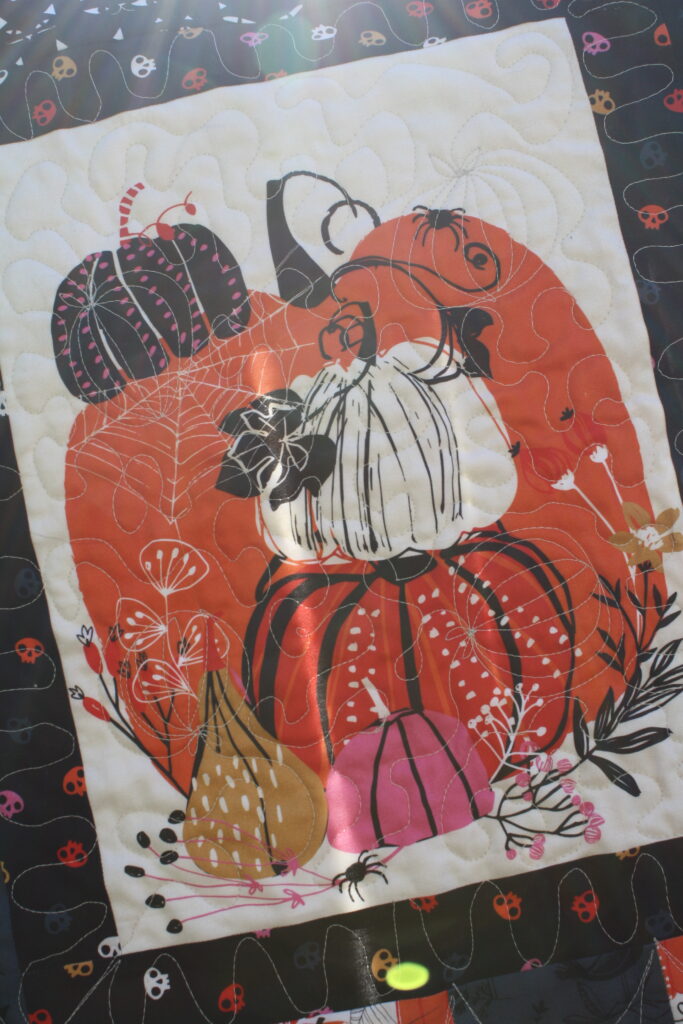
I came across this Full Moon panel by Helen Black for Dashwood Studio and when I say I had to have it, I mean I HAD to have it! It is everything I want in a panel. It had 8 pictures of the most delightful Halloween artwork on it and they were all the same size! Now, that size was not square, but that was a problem for me to figure out later! I got the panel and 6 1-yard cuts of the coordinating fabric (I didn’t get the 7th fabric as it was already sold out). I figured, I could certainly come up with something and had enough of each fabric to do so.
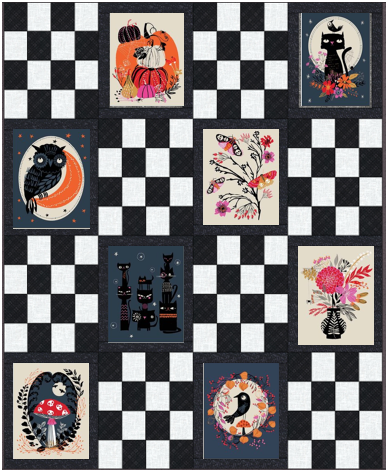
When I was ready, I started looking online for some inspiration. I looked and looked and was about to give up when I came across a pattern here. While it is a great pattern, it still wasn’t what I had in mind. It uses the complementary fabrics in an Irish Chain, but the scale of most of the complementary fabrics is pretty big and I felt like it would be a waste of the fantastic bats and ravens in the prints I picked up. So, off to the drawing board it was for me.
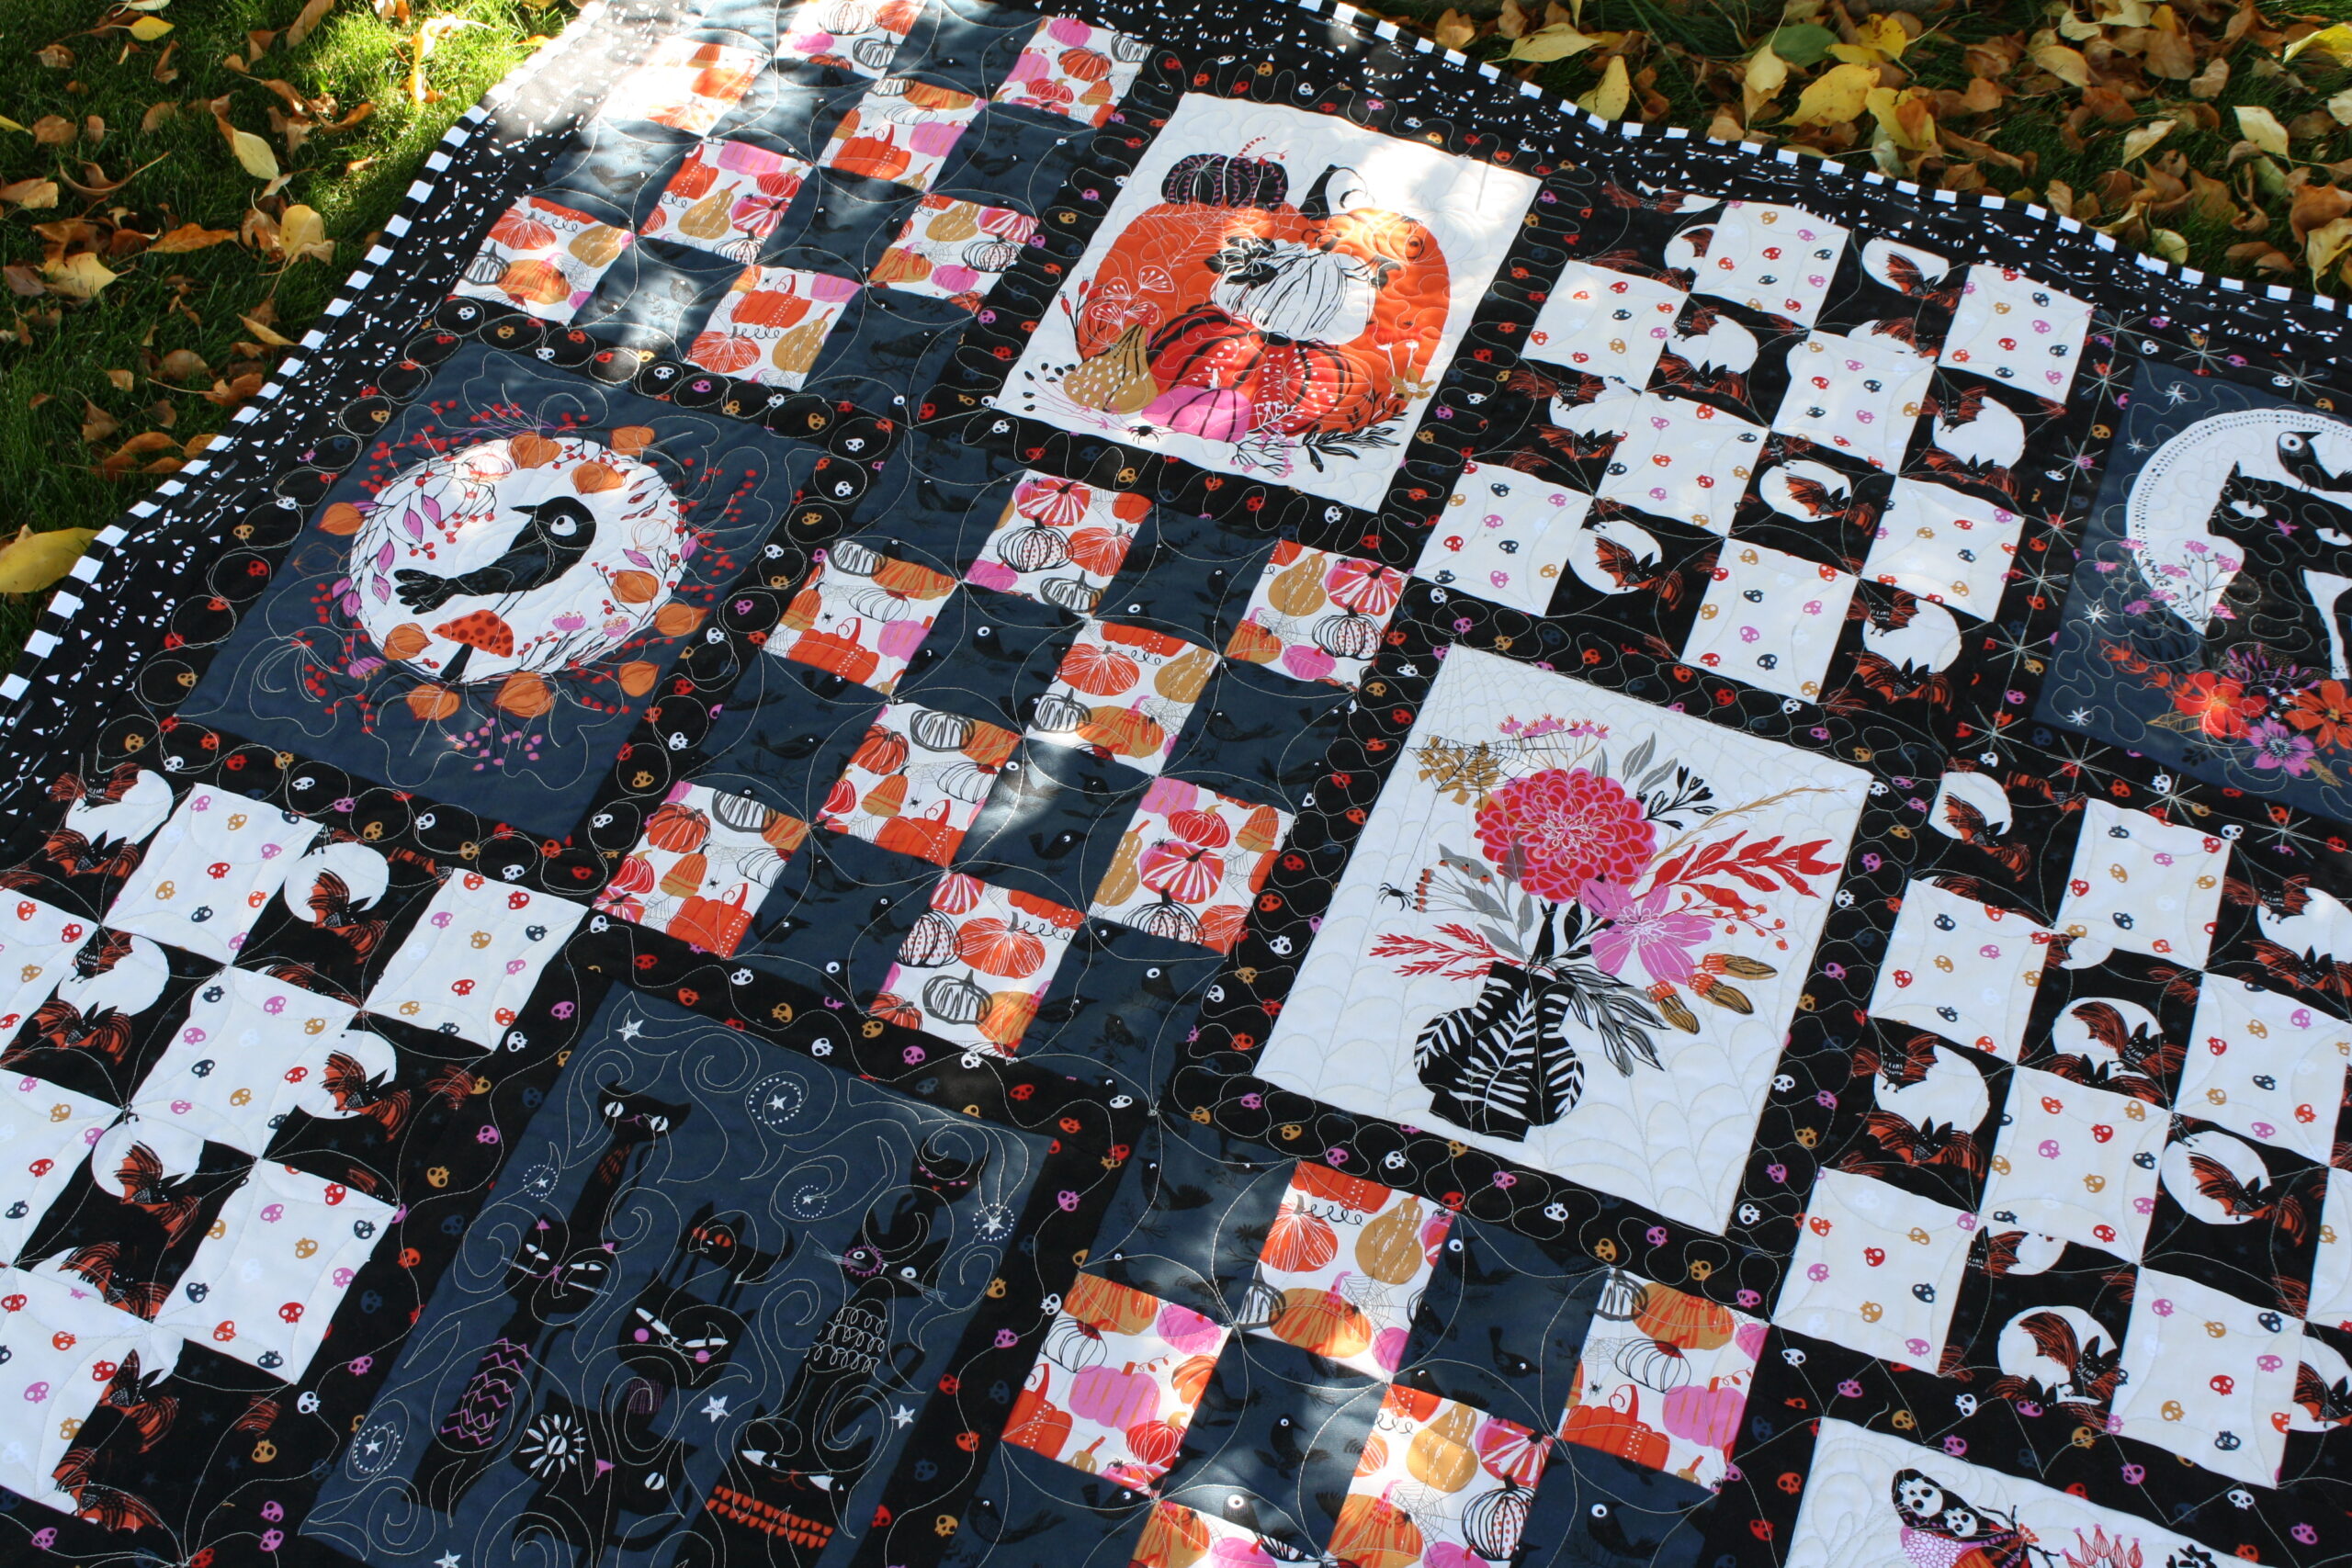
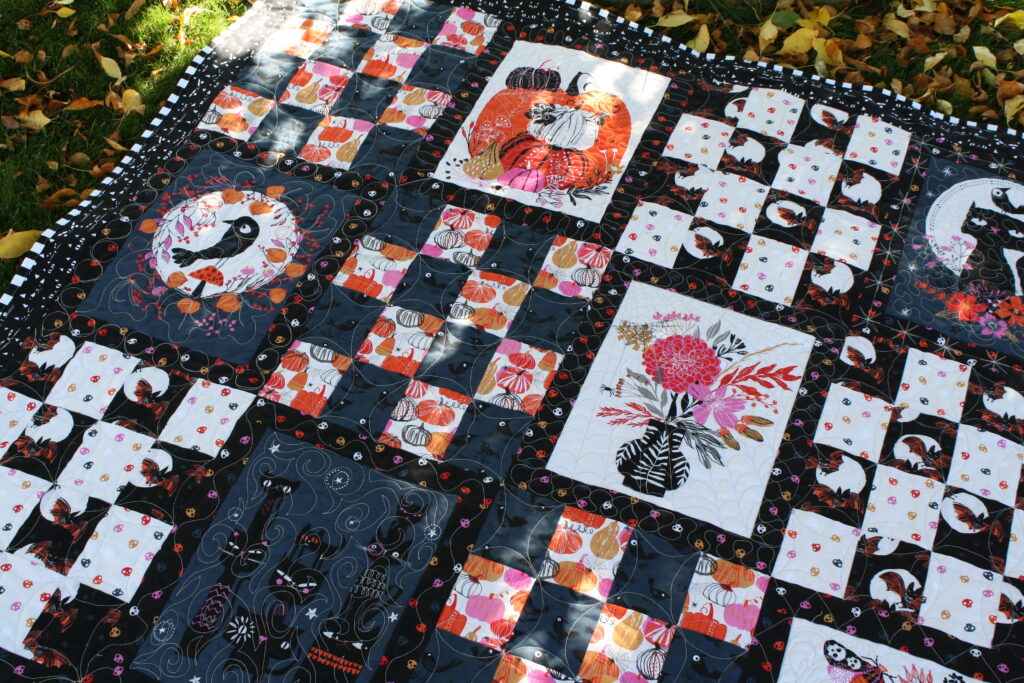
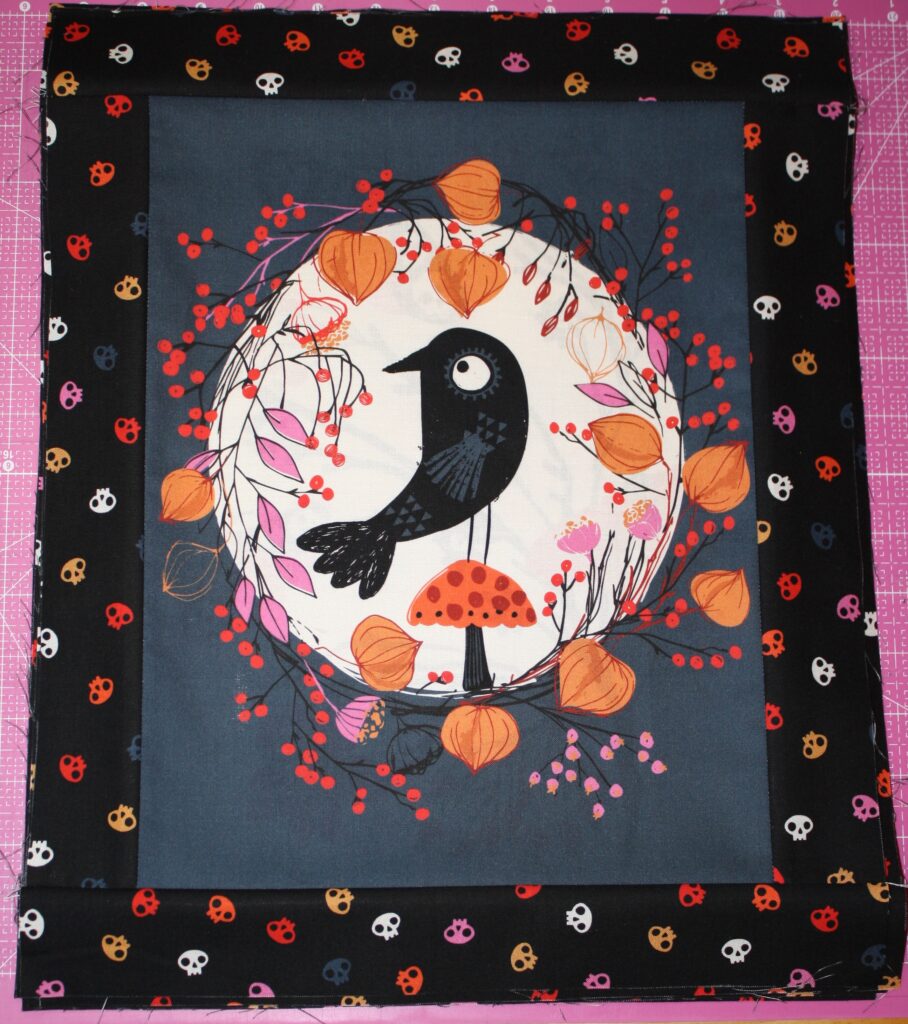
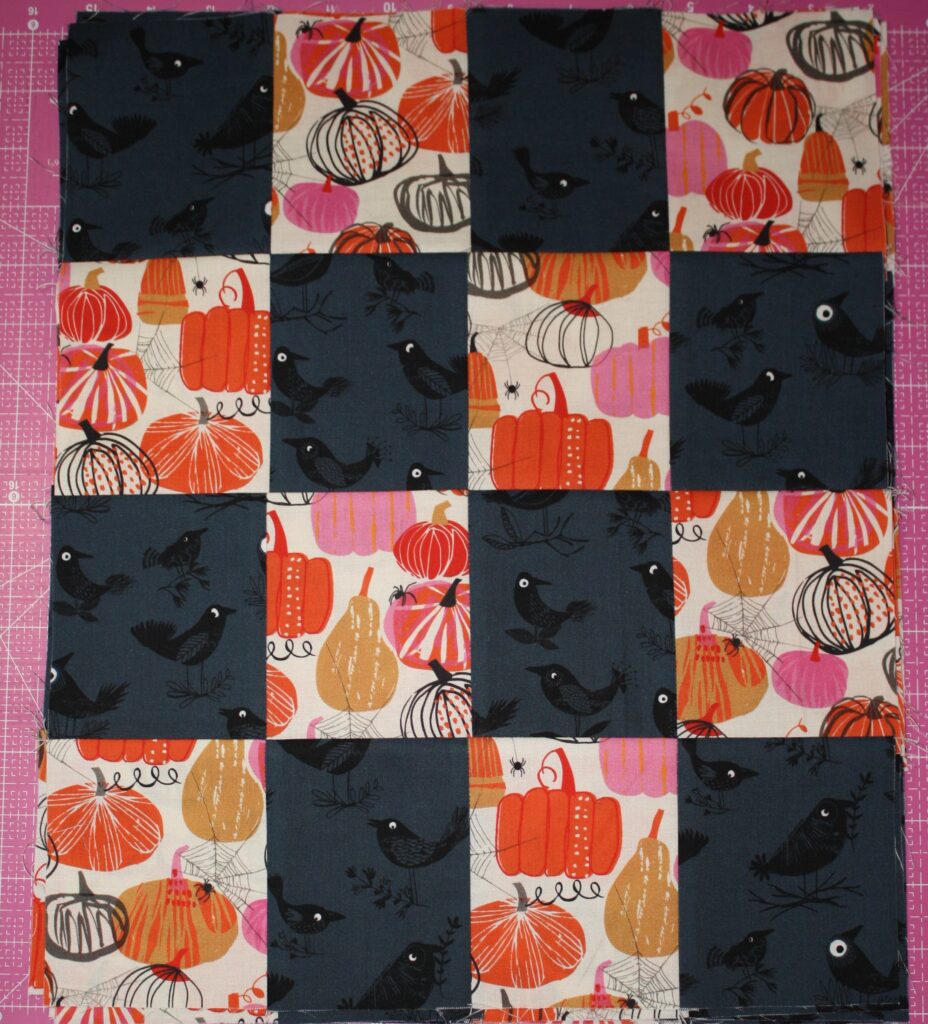
I decided to use one part from the other pattern I found, which was to frame each of the 8 panel pieces with a 1.5-inch border. I did this with the black skull fabric from the collection. This would leave me with 5 fabrics to work with around these blocks. I wanted the pieces in my alternating blocks to be large enough to show the bats, ravens, and pumpkins without the need to fussy cut, but I also didn’t want the pieces to be too big. I also decided to set one of the darker prints aside for a border (I chose the cat eyes print for this) so I could make blocks using each a dark and light print. After a bit of deliberation and math, I decided to do 16 patches and alternate them with the blocks made with the panel. I thought 4 patches would be too large, but I still wanted it to be a simple block that was large enough to show the bats and ravens.
Fabric Requirements – finished size 56″ x 68″
· 1 Full Moon Panel
· Fabric to frame panel pieces – 5/8 yd (I used the black skull print)
· 4 Prints for the 16 patches – 1/2 yd each (I used the bats, ravens, pumpkins, and cream skull prints)
· Border – 3/4 yd (I used the cat eyes print)
· Backing – 3.5 yd (includes about a 3.5-inch overage)
· Batting – 63″ x 75″ piece
· Binding – 1/2 yd
Start by cutting the panel into 8 pieces and trim each to 10.5 x 13.5 inches if needed (mine were just a tiny bit larger than this). Then with the fabric you are going to use to frame the pieces, cut (11) 2-inch x WOF strips. Sub-cut these to (32) 13.5 x 2-inch strips.
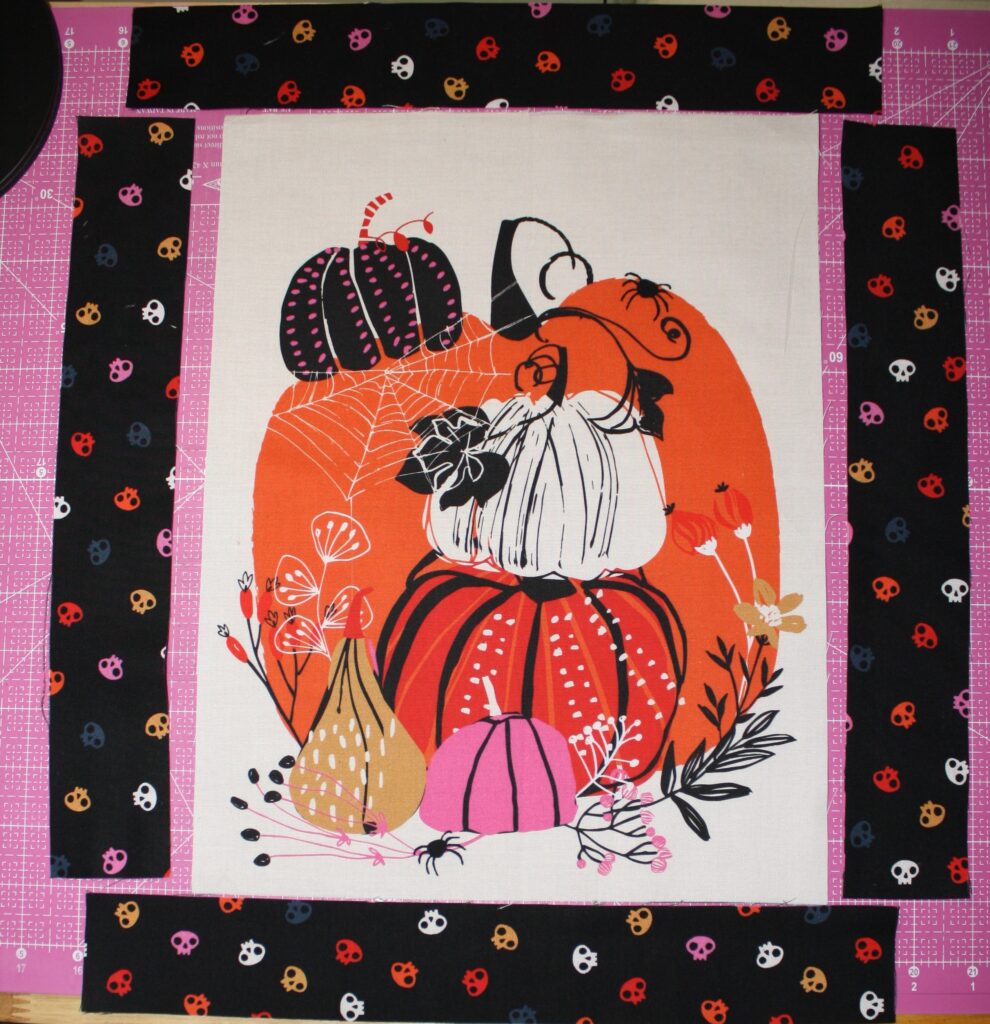
Sew a strip to each side of the panel pieces and press out. Then sew a strip to the top and bottom of each panel piece and press out.
Next, cut (3) 4.5-inch x WOF strips from each of the 4 fabrics to be used in the 16-patch blocks. Sub-cut to (32) 4.5 x 3.75-inch pieces of each fabric.
Layout your pieces in 4 x 4 sets and sew the pieces into rows. I chose to pair the bats with the skull fabric and the ravens with the pumpkin fabric, but you could mix and match this any way you like! Press in alternating directions so you can nest your seams.
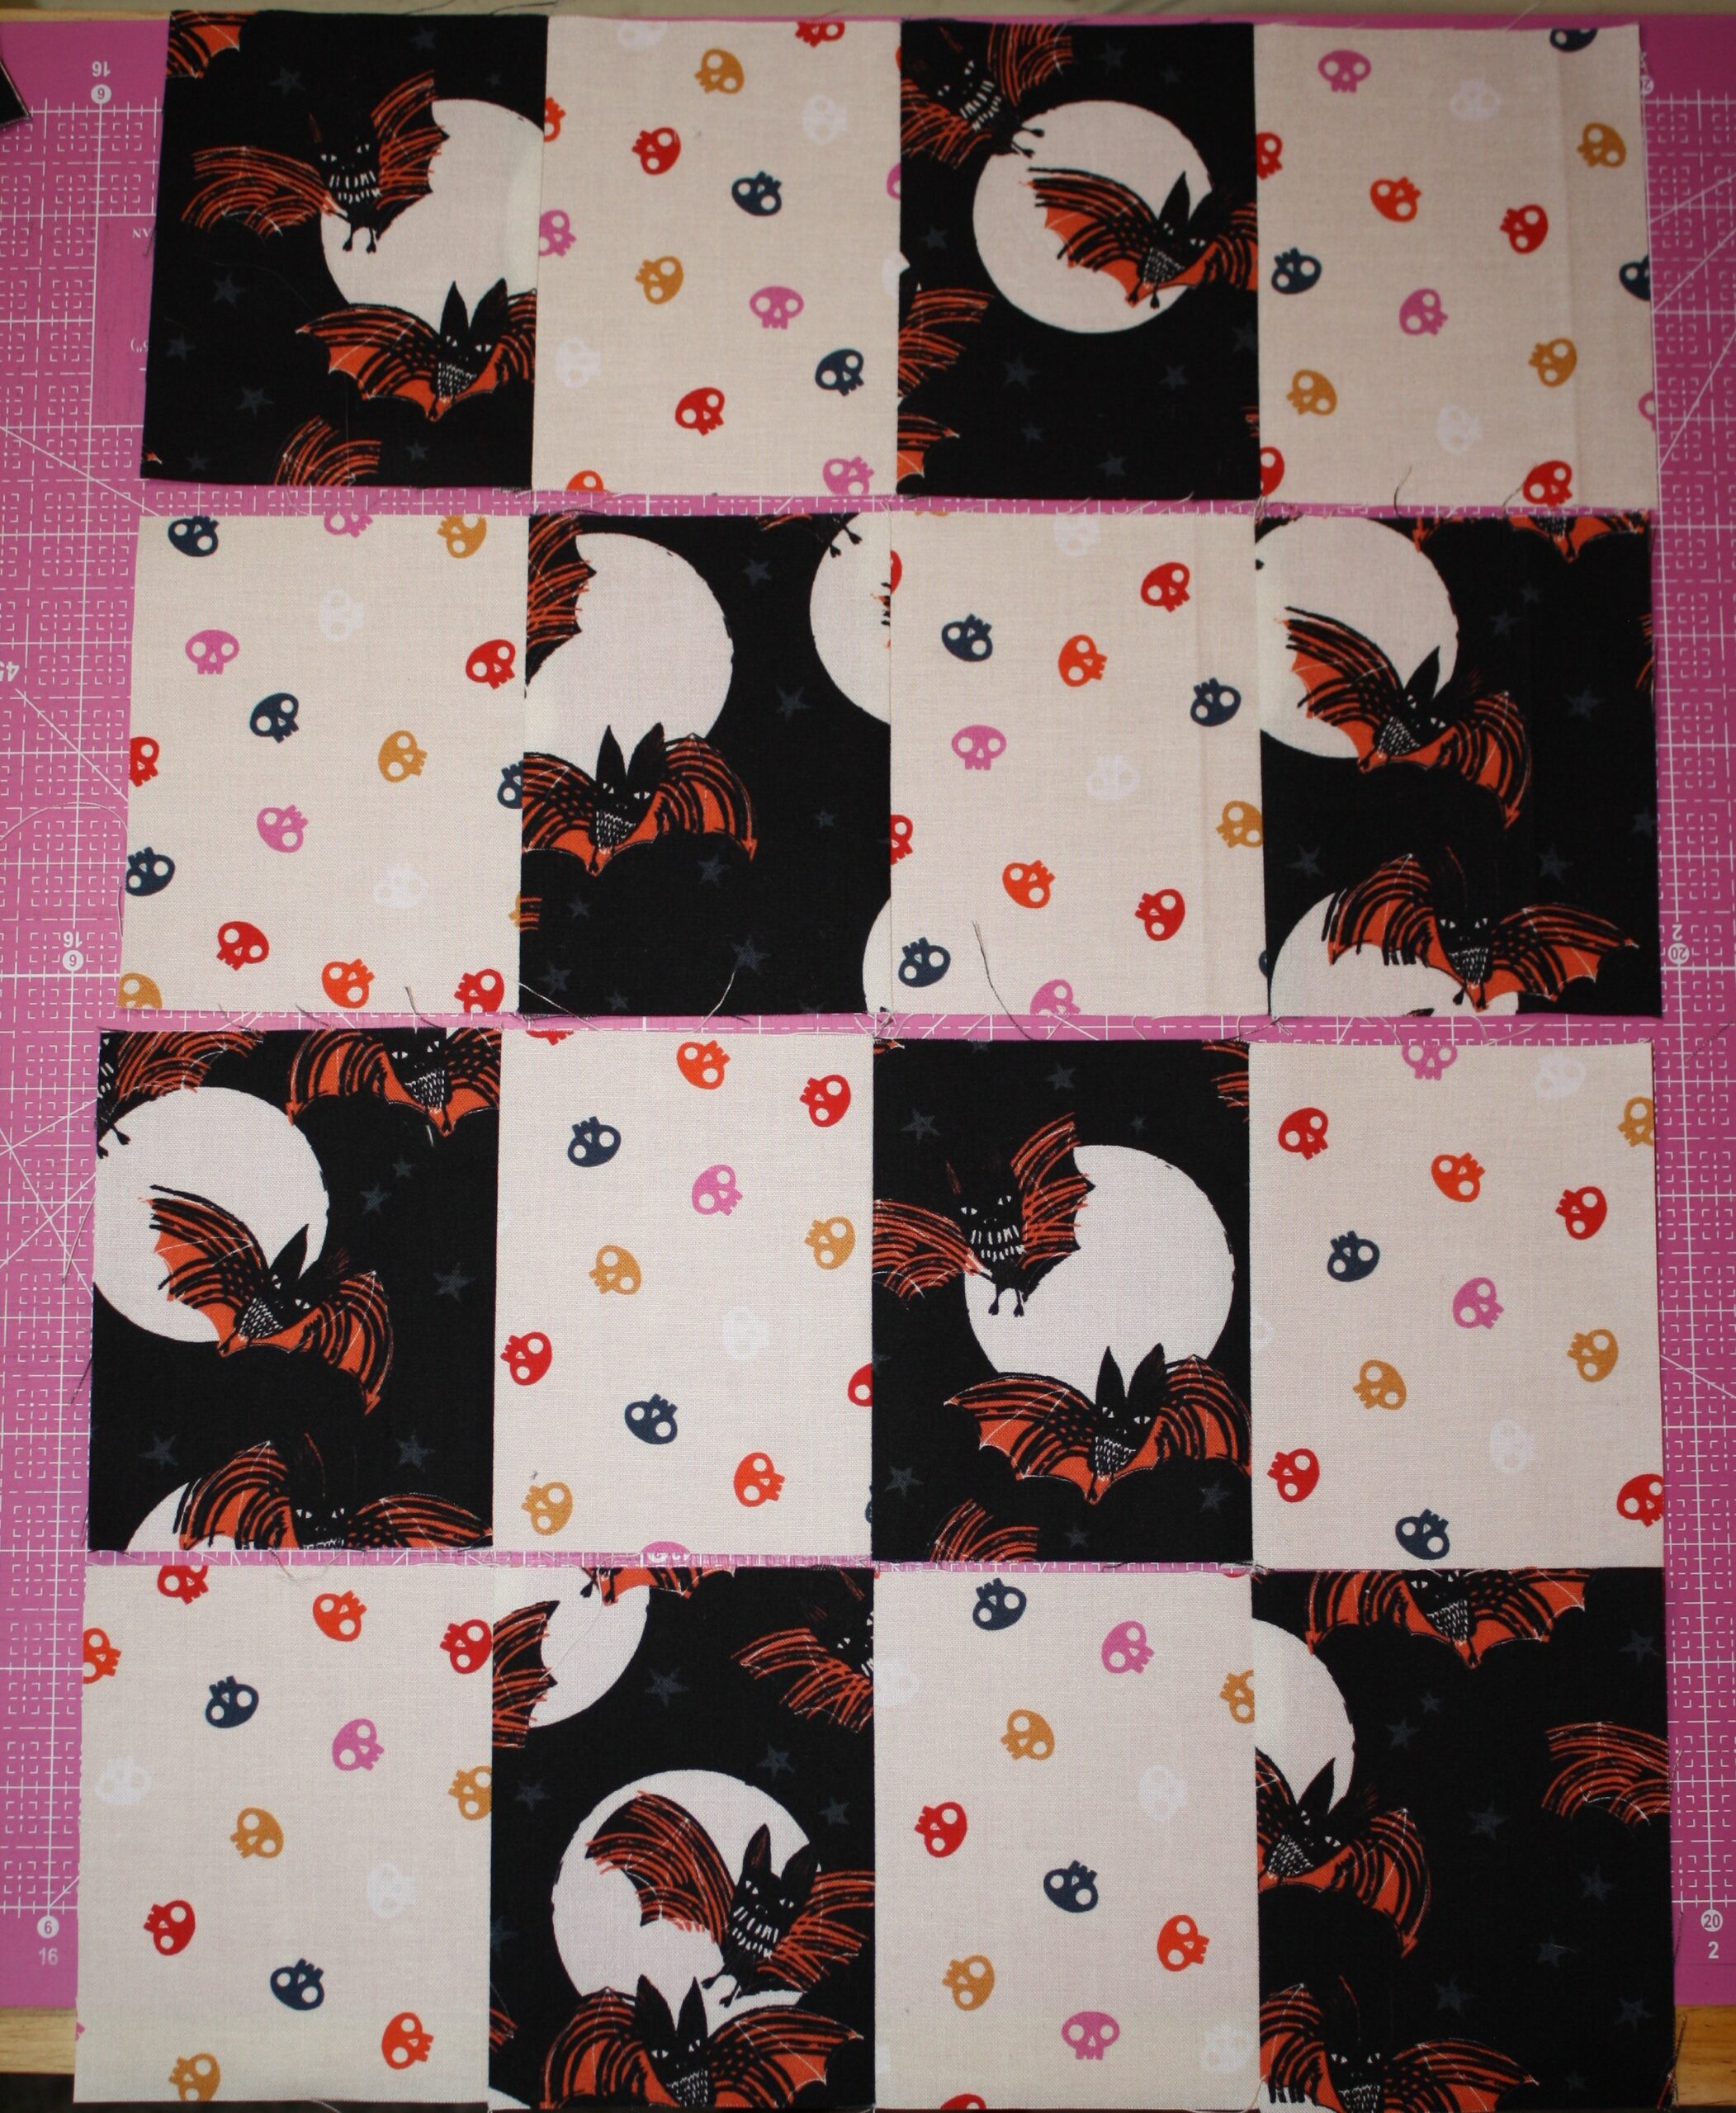
Then sew the rows together and press the seams how you prefer.
I made 4 blocks with the bats and skulls, and 4 blocks with the ravens and pumpkins.
Layout all your blocks and arrange them alternating a panel piece with a 16-patch. There will be 4 blocks in each row. Sew your blocks into rows, press away from the 16-patch blocks. Then sew your rows together and press all your seams how you prefer.
Finally, cut (6) 3-inch by WOF strips from your border fabric and remove the selvage ends. Sew these pieces end to end into one long strip and press seams. Measure your quilt top to bottom and cut your 2 side borders to match. Sew to each side and press toward the border. Repeat for the top and bottom borders.
Piece your backing and press seams. Make your quilt sandwich, baste and quilt as desired. Cut (7) 2.5-inch x WOF strips and make the binding for your quilt. Bind your quilt as desired. I got to mess around with some free motion quilting on this one. I am not the best at this but like to practice from time to time and just have some fun with it!
You should have a quick and easy Halloween quilt in no time! If you make this quilt and share it on Instagram, tag me, I’d love to see it!
Hope you have a wonderful Spooky Season!